Friday, November 30, 2012

November Foodie Pen Pals Reveal Day

This month I participated for the first time in a program all foodies should take part in: Foodie Pen Pals.  When I first heard about the program several weeks ago, I was intrigued.  I love talking food with people who share the same interest.  So what is it do you ask?  Foodie Pen Pals was started in 2011 by Lindsay at the Lean Green Bean.  It is where you send your assigned pen pal a goodie box of food products that is worth $15 along with something handwritten (maybe a recipe or an explanation of the things you sent).  These foods can be any thing of your choice, depending on your pen pal's dietary needs of course.  At the beginning of every month, you get paired up with your pen pal.  It is your responsibility to email them to find out what their dietary needs are, likes, dislikes, and so on.  You mail out your goodie box by the 15th of the month, and if you are a blogger, you write about the box you received at the end of the month.  Blog readers, you can take part too!  Fun right??  How do you get involved?  Click the link below.  But for the month of December, FPP is taking a hiatus to raise money to help victims of Hurricane Sandy.  Click HERE for more information and to get involved.

FPP post Foodie Penpals

I had such a blast in my first month of participating.  This month I received a goodie box from Margaret from Raleigh, NC.  She emailed me the day we received our matching (which I loved!) and felt she was very thorough in her questions on what to choose for me.  Once November 15th came, I anxiously awaited for my goodie box.  When it came, I could not wait to open it. 


She sent me sweet potato crackers (delicious!), homemade roasted peanut butter with honey and salt (yum!), pomegranate molasses, Escazu chocolate, and a very sweet card explaining her goodies.  She said the pomegranate molasses is commonly used in Middle Eastern dishes.  I cannot wait to try this out!  I will admit that I took a finger swipe of it and the taste is indescribable!  I will be sad the day it runs out, but there are many recipes that explain how to make it.  Looks to be pretty easy.  Honestly, if Michelle didn't send me some I probably wouldn't have thought it would be worth the trouble making some! THANK YOU, MARGARET!!


I haven't tasted the Escazu chocolate yet.  Saving it for a weekend at home, on the couch, catching up on my TV shows.  Dietetic internship keeps me pretty busy and can't stay awake past 9:30pm to watch anything.  So far, what I love about this chocolate is that they include a batch number on each bar and that they are a local producer that cares about their product.  I'll be sad the day I finish this chocolate.  Can't wait for the next FPP starting in January; meanwhile, participate in Foodie Pen Pals for Hurricane Sandy

Thursday, November 29, 2012

Kielbasa Cabbage

It wasn't until last new years that I finally gave cabbage a chance.  I think this feeling mostly comes from my only childhood memory of cabbage.  Growing up Dad would make huge batches of Hungarian cabbage rolls.  When I say huge, I mean a 10 quart soup pot filled with cabbage rolls.  My sister and I did not eat any of them (we thought they stunk), which left my parents eating them for dinner that week.  And maybe for lunch the next.  I always knew when Dad was making them because the smell would wake me up on Sunday morning.  And I wouldn't come out of my room the rest of the day.


But on New Year's Day, I had some of the best cabbage I've ever had.  It had the perfect balance of sweet and bitter.  The cabbage had a nice crunch to it still.  And it was all rounded out by the sausage and potatoes.  This recipe is very simple to make and the longer it sits in the fridge, the better it tastes (even cold).

Kielbasa Cabbage
Makes 8 servings

1 lb Kielbasa Turkey Sausage, cut into 1/2 inch slices
4 tbsp Butter or Olive Oil, divided
1 large Cabbage, coarsely chopped
1 large Onion, chopped
3-4 Garlic Cloves, finely chopped
4 Red Potatoes, cubed
1 tsp Paprika
Salt
Pepper

  1. Add cubed potatoes to a pot.  Add water until just covered.  Add salt.  Cook until potatoes are tender.
  2. In a Dutch oven over medium heat, melt 1 tbsp butter.  Add sausage.  Cook until browned, about 5 minutes  Remove and set aside.
  3. Add remaining butter to pot.  Sauté cabbage, onions, and garlic until soft, about 10-15 minutes.
  4. Season with salt, pepper, and paprika.  I like to add plenty of pepper.
  5. Combine cabbage, sausage, and potatoes.
Nutrition Content
Calories: 266 Total Fat: 12.6 g Sodium: 665 mg Total Carb: 28.4 g Fiber: 5.7 g Protein: 12.8 g Vitamin C: 110% DV Calcium: 10% DV
Iron:
11% DV

Sunday, November 25, 2012

Homemade Fruit and Nut Bars

I feel like there are TONS of recipes for granola bars and energy bars out there, and yes, this is another one.  But what I love about this recipe is the ease and versatility of it.  This recipe is one that my mother found (found here) and adapted to her tastes.  Unfortunately for me, I cannot eat them due to a tree nut allergy, but every time she makes them while I'm home, I enjoy the aroma they put off in the house.  And they are also pretty.

Now you can buy these energy bars but making these guys is pretty simple.  Additionally, these have bigger pieces of fruit, nuts, and seeds, which I feel gives them more substance.  According to Mother, they taste fresher and hold her over until lunch.


Homemade Fruit and Nut Bars
Adapted from Enlightened Cooking

1/3 cup Toasted or Raw nuts, used roasted mixed nut blend, coarsely chopped
1/2 cup Seeds, used pepitas
1/2 cup Dried Fruit, used dried cranberries and golden raisins
1/8 tsp fine sea salt (omit if using salted nuts)
1/3 cup Brown Rice Syrup or Lite Cane Syrup (honey will not work, bars will be sticky instead of crispy)
1/4 cup Mini Dark Chocolate Chips
  1. Preheat oven to 325F. Line a 9-inch square pan with foil and lightly spray with nonstick spray (do not skip this step!).
  2. In a medium bowl, combine the chopped nuts, seeds, dried fruit, and salt.
  3. Add the syrup and stir to coat.
  4. Scrape mixture into prepared pan.  To press it out evenly use a sprayed piece of foil the size of the pan and spread evenly into pan. 
  5. Bake for 18 minutes.  The bars will not be hard at this point. 
  6. Place pan on cooling rack and let cool for 15-20 minutes until partially set up.  Use the sides of foil to lift the bars from the pan.  Do not try to remove from foil because they will stick like crazy.  Cut into 12 bars.
  7. Flip bars over to let the syrup seep back into the bars. 
  8. Once cooled, wrap in plastic wrap and store in an airtight container at room temperature for up to 2 weeks.  
Makes 12 bars

Nutrition Content
Calories: 116 Total Fat: 6.1 g Sodium: 15 mg Total Carb: 15.2 g Fiber: 1.1 g Protein: 2.3 g

Monday, November 19, 2012

Asian Dumplings

I have been searching for a potsticker recipe for quite some time. Every recipe I came across had too many cons for my tastes.  This long and unsuccessful search led me to combining several recipes into one rather tasty finger food.

These little dumplings are rather addictive. They are good hot. Cold. As a late night snack. Breakfast even? Honestly, this filling can be changed so easily and by what’s in season that I probably could not get tired of eating these little lovelies.  When I first made these, they were vegetarian, and I used half of a medium sized head of cabbage plus the rest of the listed ingredients (recipe below).  This recipe contains pork, which I substituted half of the cabbage for half a pound of ground pork.  Just as tasty and filling.


Another reason I absolutely love this recipe is that it gives me an excuse to pull out my super duper, fancy schmancy stand mixer (I think we all know what mixer every cook/baker wants to have on their kitchen counter) and make some homemade wonton wrappers.  Yes, I made my own wonton wrappers.  Yes, I know I can go out and buy a package of 50 wrappers for $2.50 and cut the prep time in half.  But where’s the fun in that?  The recipe I used (found here) makes about 75 wrappers (depending on size and shape) for less than one dollar.  My recipe and tips to follow in a future post.


I want to freeze these bad boys so I can have them any time I want.  I'll update this post when I do that.

Asian Potstickers
Adapted from Williams-Sonoma and Om Nom Ally

50-75 Wonton Wrappers 

Filling
1/2 pound Ground Pork
2 cups Cabbage, cored and finely chopped (about 1/4 medium cabbage)
3 Scallions, finely chopped
1/2 cup Carrots, finely chopped
1 medium Zucchini, grated
1 inch Ginger, grated
2 large Garlic Cloves, grated
1-2 tsp Rice Vinegar
2 tbsp Soy Sauce
1 tbsp Hoisin
1/8 tsp Sesame Oil
2-3 tsp Salt (about 1 tsp for every cup of cabbage)
1/2 - 1 tsp Chili Garlic Paste (optional)

Dipping Sauce
~ 1/8 cup Soy or Teriyaki Sauce
1/8 - 1/4 tsp Chili Garlic Paste (depending on how spicy)
1 tsp Rice Vinegar
2 tsp Hoisin

  1. Using a food processor, process cabbage until finely chopped.  Place cabbage in a large bowl. Add salt.  Let sit for 10 minutes.  Using a towel, squeeze out the liquid and place back into bowl.
  2. Grate the zucchini. Using a towel, squeeze out the liquid. Add to cabbage.
  3. Cut the carrot and scallions into the food processor and process until finely chopped. Add to cabbage.
  4. To cabbage, add ground pork, ginger, garlic, rice vinegar, soy sauce, hoisin, and sesame oil. Mix until well combined.
  5. On each wonton square, place 2 teaspoons of filling. Dip finger or basting brush into water and cover the out edges of the wrapper. Fold together while squeezing out excess air. Continue this process with remaining dumplings.
  6. In a large pan over medium-high heat, add a tablespoon of vegetable oil. Heat until hot and almost smoking.  Add 10 to 12 wontons and cook until golden brown, about 3 to 4 minutes. Add 1/4 cup of water or chicken stock to the pan and cover. Cook for an additional 5 to 6 minutes, until all the liquid is evaporated. Continue this process until all wontons are cooked.
  7. Dipping Sauce: In a ramekin, combine the soy sauce, hoisin, chili garlic paste, and rice vinegar. Stir until combined.

Monday, November 12, 2012

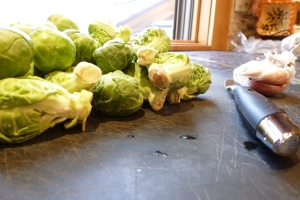
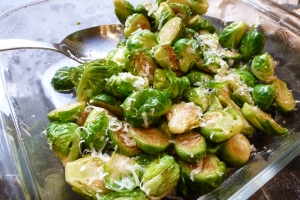
Parmesan Brussels Sprouts

I think Brussels sprouts get a bad rap, but I absolutely love these baby cabbages.  In fact, my entire family loves them, even my extremely picky little sister.  This makes adding them to any menu pretty easy, but results in my family fighting over the last ones that happen to be left in the pan.  It wasn't until this year did I even like them (I didn't like them because I hadn't tried them).  Big thanks to my uncle for showing me how to prepare them!  


The flavor of Brussels sprouts tend to vary based on season and size.  Brussels sprouts are best during the fall and winter months, but they are available year round.  When selecting sprouts, choose ones with a diameter of 1 to 2 inches and with leaves that are tightly compacted.  Even though Brussels sprouts are bitter by nature, the smaller ones are more tender and the bitterness is less overwhelming.


Parmesan Brussels Sprouts
Makes 4-6 servings

1 1/2 pounds small Brussels Sprouts
5-6 Garlic Cloves, smashed
1/8 cup Extra Virgin Olive Oil
1/8 cup Chicken or Vegetable Broth
1/4 cup Parmesan Cheese
Pepper, to taste
Salt, to taste
  1. Thoroughly wash the Brussels sprouts in cool running water.  Remove dark outer leaves so that the lighter green leaves are revealed.  Slice off the brown portion of the stem.  Leave part of the stem intact so that the leaves do not fall apart.  Halve the sprouts lengthwise.
  2. In a large saucepan over medium low heat, add olive oil and smashed garlic cloves.  Allow the oil to come to temperature while the garlic flavor is infused.  Once the garlic starts to slightly turn brown, remove using a slotted spoon.
  3. Add the sprouts to the pan with the cut side down.  Raise the temperature to medium.  Cook until the sprouts are browned on the cut side.  The sprouts may not be completely cooked through, that’s okay.
  4. Slightly sauté the sprouts so that they are coated in the remaining oil.
  5. Add the broth.  Stir until the all of the broth has evaporated and the sprouts are tender.
  6. Transfer to serving dish.  Top with Parmesan cheese and pepper.  Salt may need added after tasting.
Nutrition Content
Calories: 154 Total Fat: 8.6 g Sodium: 228 mg Total Carb: 13.7 g Fiber: 5.2 g Protein: 8.9 g Vitamin C: 195% DV Calcium: 20% DV
Vitamin A:
21% DV Iron: 12% DV

Friday, November 9, 2012

Chili

I love chili!  Especially on days when its cold or rainy or snowy.  It is my go to comfort food.  Even in the summer when I'm feeling down, I want chili.  I don't make it though because of the hot, humid days.  But when the first cool day hits, usually sometime in early October, I whip up a batch.


I love this recipe.  It's extremely easy to make, and I usually have all the ingredients on hand.  When it's cold, I always keep them in the pantry.  And the fact that it uses ground turkey instead of ground beef, is amazing.  I don't even miss it.  The one thing I hate is that there are too many canned ingredients.  I haven't had the time (or patience) to learn how to reconstitute dried beans.  Once my internship is over, it is my goal to do so.  Then learn how to can them.  Until then, store bought canned beans it is!

Chili
Makes 6-8 servings

1 medium Onion, chopped
2-3 Garlic Cloved, finely chopped
1 lb Lean Ground Turkey
2 tbsp Tomato Paste
1 (15 oz) can Reduced Sodium Black Beans
1 (15 oz) can Bush's Chili Beans (or preferred brand)
1 (15 oz) can No Salt Added Diced Tomatoes
1 1/2 cups Beef Broth, plus more as needed
3 tbsp Chili Powder
1-2 tsp Paprika
Salt
Pepper

  1. Spray a large pot with cooking spray.  Place over medium high heat.
  2. Add ground turkey.  Cook until mostly brown.  Add salt and pepper to taste and 1 tbsp chili powder.  Stir to combine.
  3. Add onion and garlic.  Cook for 2 minutes.
  4. Stir in tomato paste.  Cook for 2 minutes.
  5. Add all the beans, tomatoes, 1 1/2 cups beef broth, paprika, and remaining chili powder.  Stir to combine.  Reduce heat to medium low.  Simmer for 30 minutes, stirring occasionally.  Add more beef broth if the chili becomes too dry for your tastes.
  6. Serve hot.  Top with desired toppings of shredded cheese, sour cream, crackers....
Nutrition Content
Calories: 189 Total Fat: 2.2 g Sodium: 1318 mg Total Carb: 22.3 g Fiber: 7.5 g Protein: 20.1 g